


Most of you are aware that using Docker locally on Windows with Hyper-V enabled can be really slow for most Laravel or any other type of project. Sure, that kind of setup is much simpler; your project files are on your hard drive, and you are running Docker and any additional tools that your project depends on natively inside your Windows OS. Hey, I've been using Docker that way for a while and actually got used to 5-8 second page load times. I know, that's pretty bad. Your project and load times might not be as big, but they could still be improved.
Once, I tried running my projects inside WSL, but that introduced other issues, the main one being that my files were taking too long to be indexed both by Git and PhpStorm. So for the files to be indexed properly, I would have had to install Git, Sourcetree, and possibly PhpStorm inside WSL. That seemed like too much hassle, and I would have needed a decent alternative to Sourcetree since it isn't available for Linux systems.
So I gave up for a while. Recently, those load times were starting to get bigger and bigger from time to time, so I decided to search for alternatives again to improve performance. Obviously, I didn't want to give up on Docker since it provides me with an environment that is the closest to the setup on the server we've been using. While XAMPP, Laragon, or WAMP might be good alternatives for certain types of projects, I started digging deeper into using Docker with WSL. So I came across this article. The author suggested using PhpStorm's automatic deployment feature to sync files from Windows's filesystem to the ones on WSL through SSH. At first, that setup seemed a bit over the top, since an alternative might have been to use the built-in remote interpreter of PHPStorm to directly access WSL's filesystem (\$wsl), but when I tried it, that proved to be slow as well, and it didn't resolve my Sourcetree issue, so I decided to give it a go.
So, while you may refer to the article above for a summary, I'll describe a bit more in depth the steps I took to perform that kind of setup, what modifications I made, and what problems you might expect.
Initial setup
I've been using Windows 10 with 16GB of RAM, Docker for Windows v4.15.0, and PhpStorm v2023, but this kind of setup should work on Windows 11 and other newer versions of Docker that support WSL integration. In the final implementation, I was able to reduce the page load times from 5-8s to 200-300ms, which was a significant improvement. At the same time, I eliminated any issues with the performance of my other tools, like PhpStorm and Sourcetree. But this approach does come with some caveats, which we will explore a bit later.
Before we start, please note that this setup requires you to use PhpStorm as your IDE or a similar tool from JetBrains. Other tools might have similar functionalities you can use, but they won't be addressed in this article.
Installing WSL and Docker setup
The first step is to install WSL2 and set up Docker to run inside it. If you don't have WSL2 installed already, you can follow the instructions from Microsoft's website. On that link, you can also read about additional helpful commands.
The most important things to note here are that you can install WSL by running wsl --install or update an existing installation by running wsl --update. Currently, the latest version is Ubuntu 22.04.2 LTS. Use wsl -l -v to check your WSL version, and you should set the default WSL version to WSL 2 with wsl --set-default-version 2. When typing just 'wsl', you should be able to access the distribution, and you can shut it down with wsl --shutdown. You will be asked to create a username and password when you launch Ubuntu for the first time; make sure to save them as we are going to use them later on.
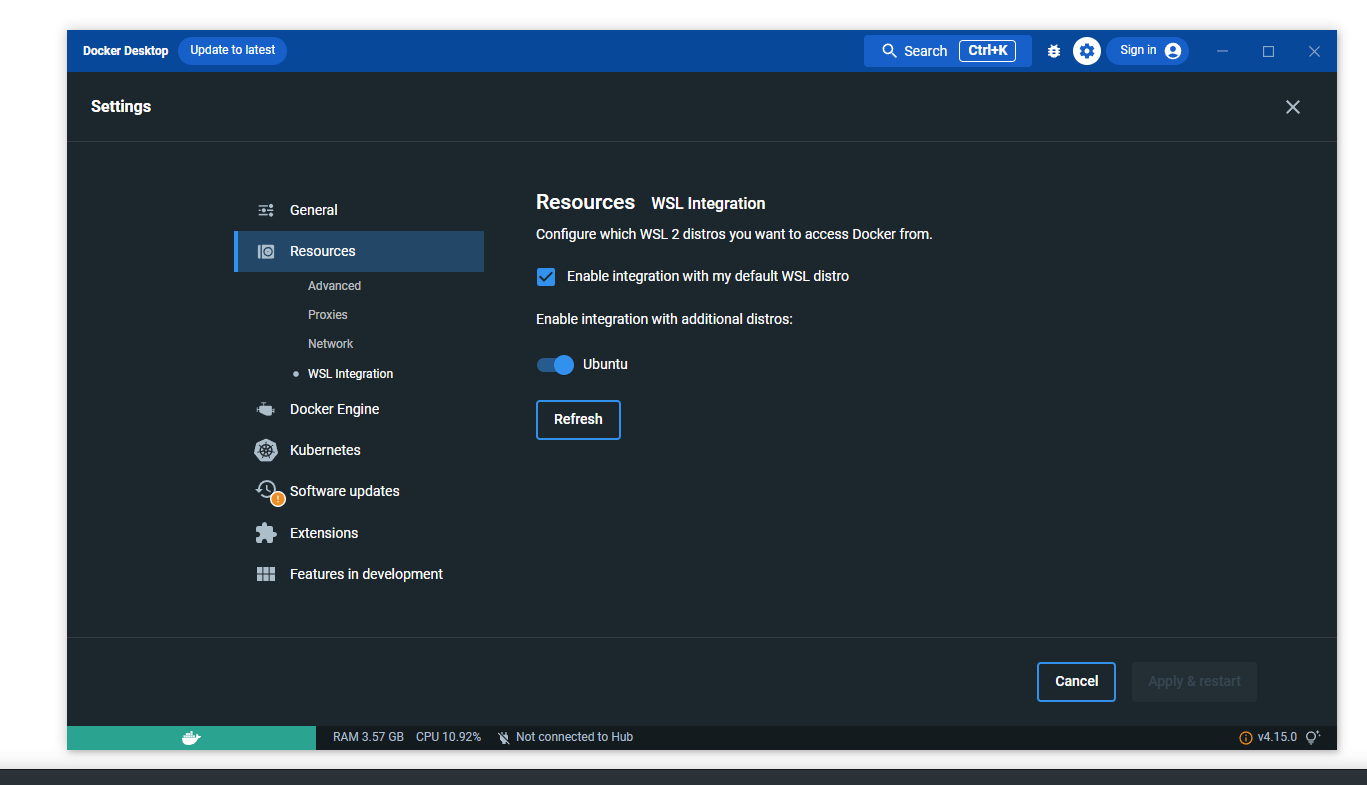
After WSL is installed, restart your PC, finish the installation, then run Docker, go to Settings > General, and enable the Use the WSL 2 based engine option. Next, go to resources and enable integration for your distribution like so:
Resources for the WSL and Docker are managed through the .wslconfig file. More about that here. What you should do is create the .wslconfig file in your text editor and add these values:
[wsl2]
memory=4GB
processors=3
localhostForwarding=true
and paste the file inside the C:\Users\<UserName> folder. You can adjust the memory and processor variables to fit your needs. For the changes from the file to be acknowledged you need to restart WSL by running wsl --shutdown and running wsl again.
Note: After these actions, Windows might act up and freeze all running programs. I am not yet sure why this is happening, but if that happens, restarting your PC should resolve the issue. Or you could just restart your PC right away, just in case, after you finish restarting WSL.
Install Windows Terminal from the Microsoft Store, it will allow you to easily access Ubuntu's terminal inside WSL.
Installing SSH
The next step is to install SSH inside Ubuntu. Inside the Ubuntu terminal, run these commands to install the SSH server:
sudo apt update
sudo apt install openssh-server
Check if SSH is running with:
sudo systemctl status sshThen run this command to allow connections to the SSH through the firewall:
sudo ufw allow sshFind your IP address with:
ip a
Save the address, you will use your IP address in the next step.
Make a folder that will hold your project in Ubuntu in /home/<username> with:
mkdir folder-nameThat will be the destination folder in the next step to which the files will be copied from Windows's filesystem.
Connecting everything through PhpStorm
We will now connect PhpStorm and our Windows project files with Ubuntu through SSH and basically copy any project files from Windows to Ubuntu any time a file is changed. Before we start, make sure that you have your IP address from the previous step and your Ubuntu username and password ready. Open PhpStorm to create a new deployment and SSH configuration.
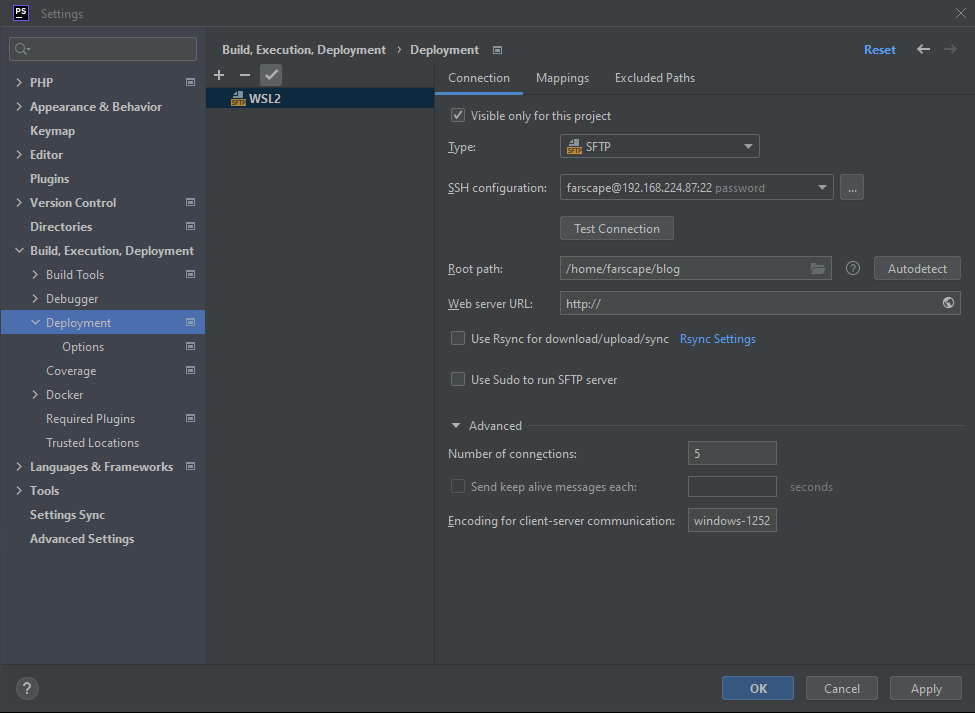
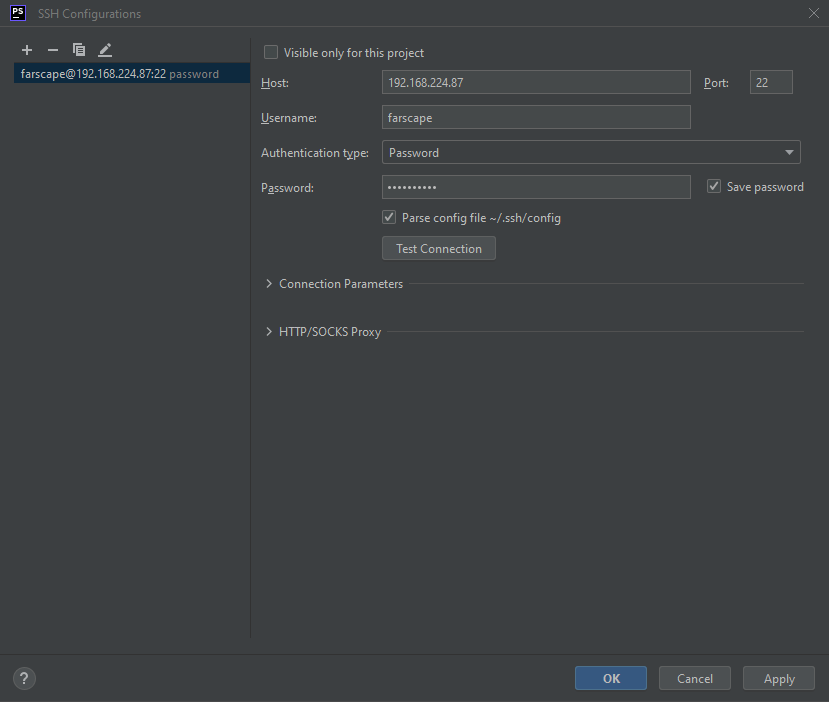
First, go to File > Settings > Build, Execution, Deployment > Deployment. Click on the plus icon (+) to add a new server, name your server, and choose SFTP as the connection type. Next click on the three dots (...) to add a new SSH configuration. In the newly opened modal, enter the Host, which is the IP address you saved earlier, set the auth type to Password, and enter your Ubuntu username and password. Test the connection and save the settings.
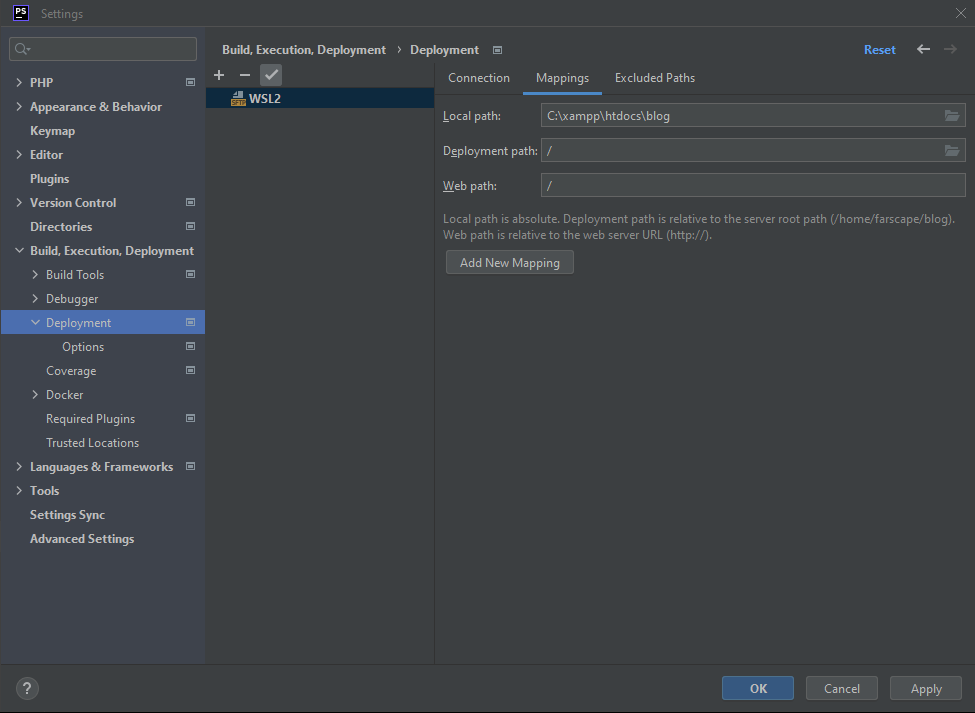
We are now back in the Connection tab of the Deployment modal. The only thing left to add in that tab is Root path and it should point to the location of your project inside WSL, for example: /home/farscape/blog. Now switch to the Mappings tab. The local path should point to the location of your project on Windows's filesystem, for example: C:\blog. Deployment and Web path can point to the root folder of the Ubuntu project, like so /.
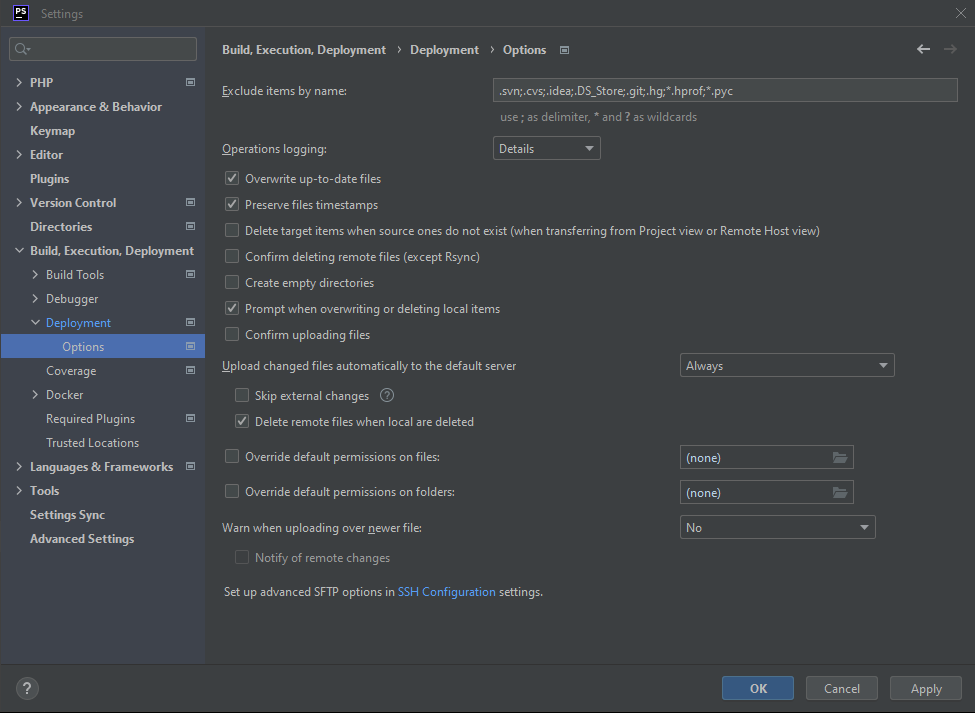
Afterwards, go to Deployment > Options. There, find the Upload changed files automatically to the default server and set it to Always. You can also tick the Delete remote files when local are deleted checkbox.
Since this setup includes quite a few steps, here are some screenshots of what everything might look like in the end:
Now, right-click on the root folder of your project and upload all of the current project files to Ubuntu:
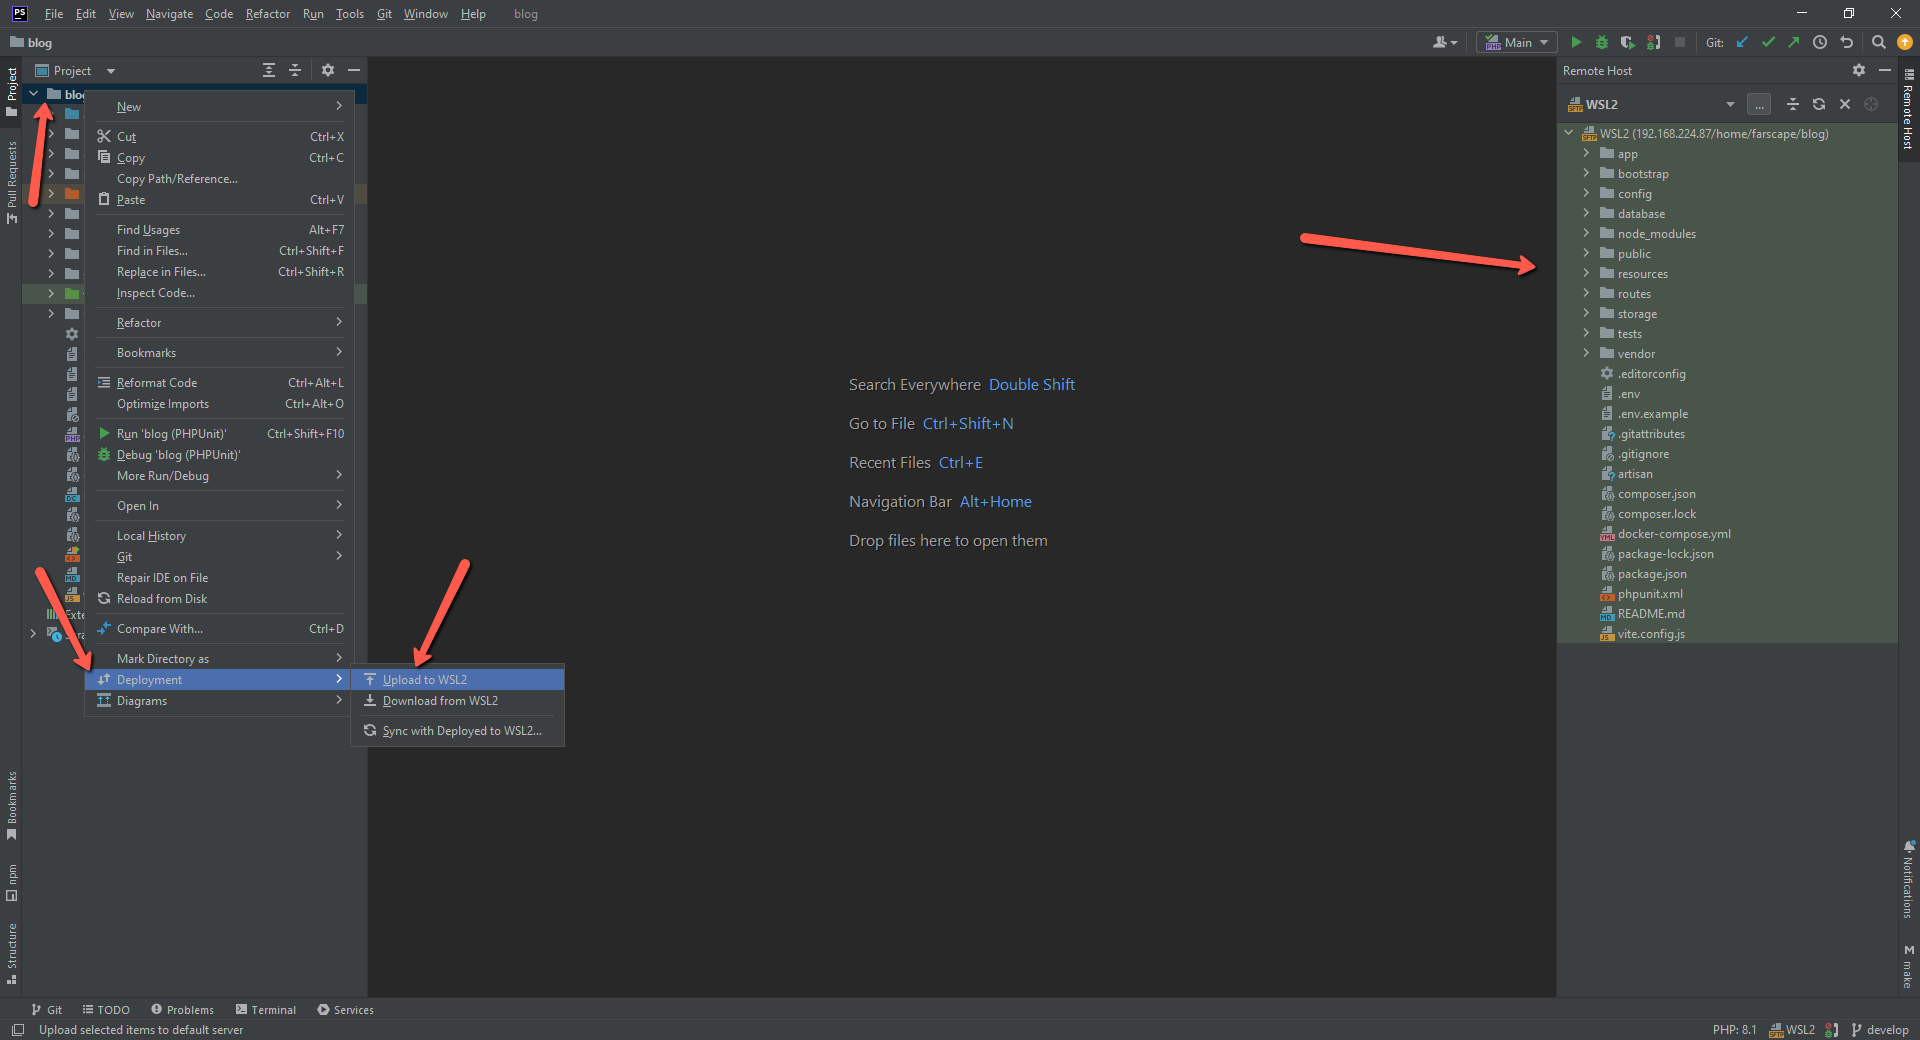
That might take some time the first time, but later on, the files will be automatically uploaded and synced. You can enable the Remote host window in PhpStorm by going to Tools > Deployment > Browse remote host.
In the end, access your project's folder within the Ubuntu terminal and build the Docker project as you usually would with the docker-compose build and docker-compose up commands. Alternatively, if you are using Laravel Sail, just build and run your project with the corresponding commands. Wait until the project is built and the containers are up. That's it. You should be able to access your app at the URL you usually would and connect to your DB with the same credentials as before. You can also start and stop containers from the Docker Desktop app. Only this time around, everything should work smoothly, and your page load times should be drastically improved.
By using this approach, we are getting the best of both worlds. This kind of setup allows us to use the advantages of Docker inside WSL without disrupting the usage of native Windows apps that are interacting with the codebase.
Caveats
Now about those caveats I mentioned. There are some issues that you should be aware of. For example, PhpStorm provides a one way connection that copies files automatically from your hard drive to the project located in WSL. So, if any files are changed inside WSL, they won't be automatically synced back to your main hard drive. Which in turn means that your version control tool won't pick up those new file changes.
So if you were to access your PHP container inside Docker and type:
php artisan make:model TestThat file would be created inside WSL only. Luckily, there is a solution, but it includes a bit of manual labor. If you right-click on any folder located on WSL inside PhpStorm, you can sync the files from WSL back to the main filesystem. You can also use options like Upload here or Download from here to upload or download files from entire folders on both sides of the connection.
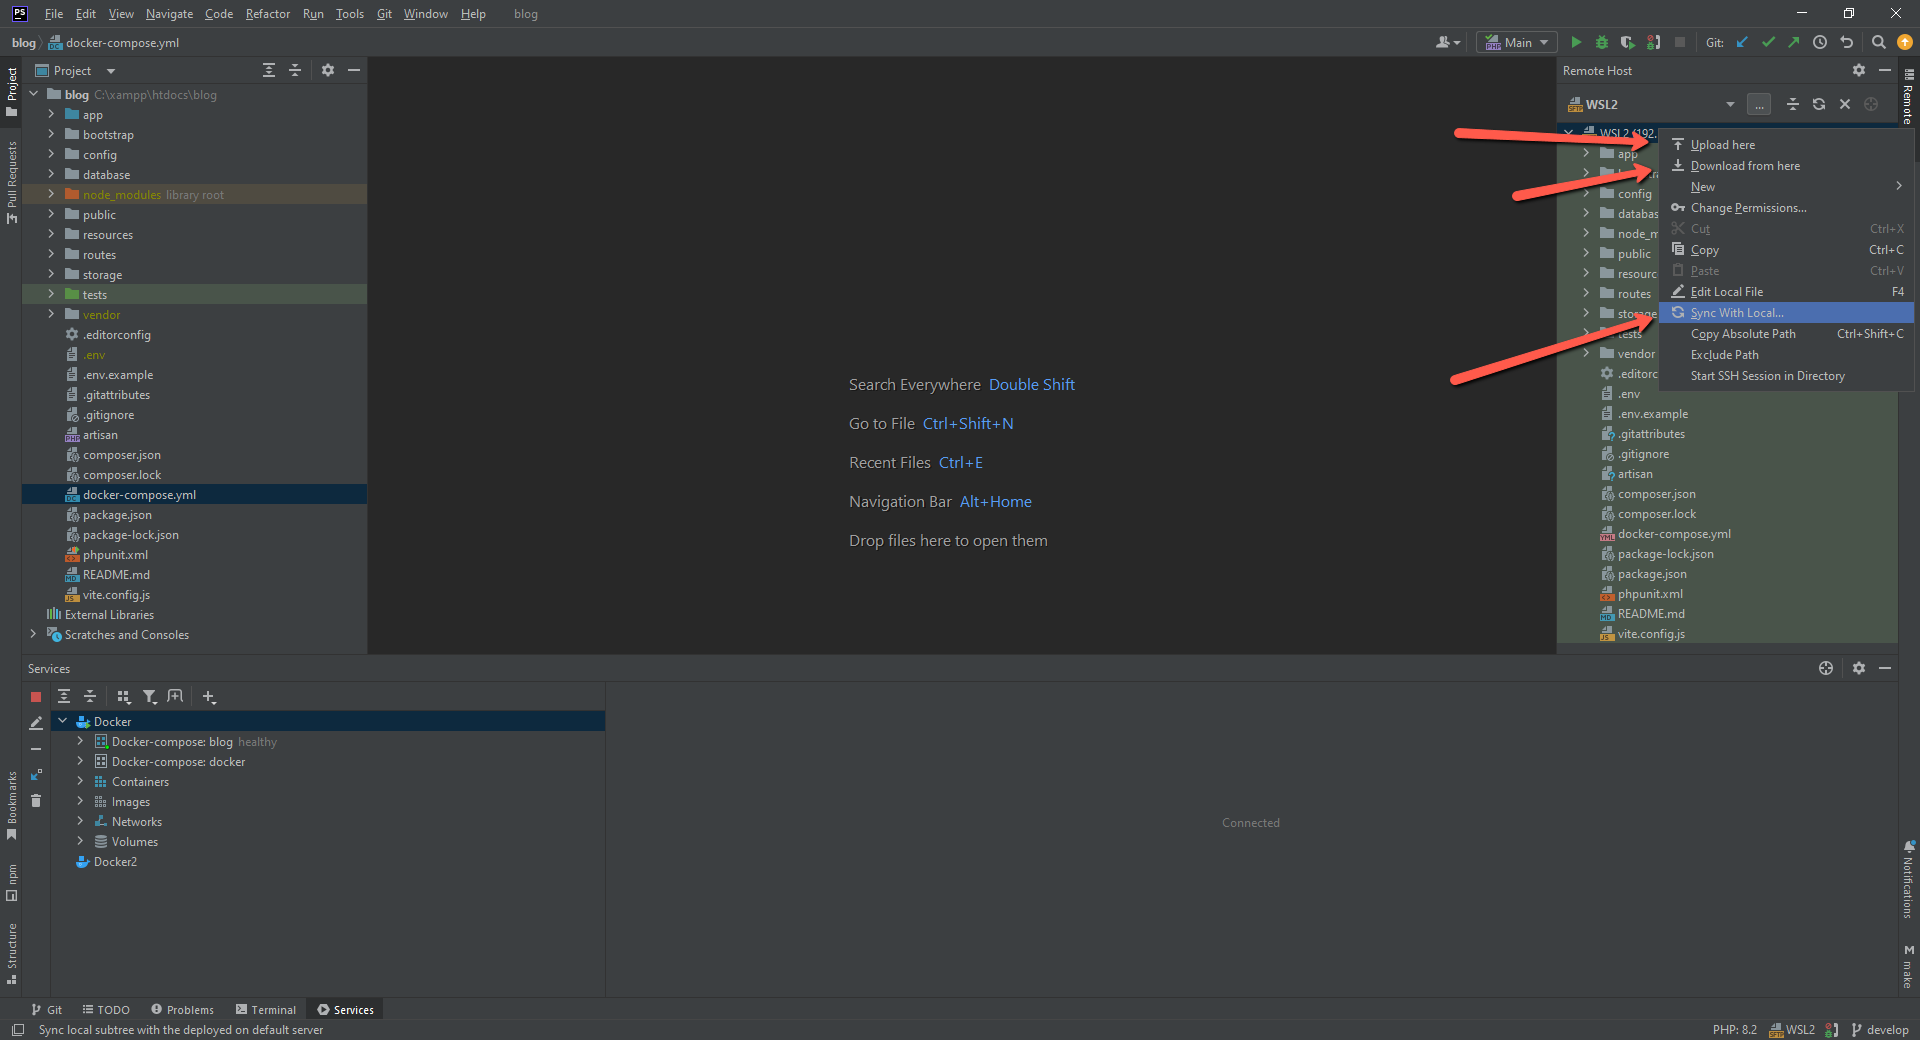
From that same drop-down menu, you can also exclude folders you might not want synced.
When it comes to caveats, that's actually the main problem: from time to time, you will have to manually sync some of the files back and forth.
Conclusion
While this whole approach may seem a bit tedious in the beginning, once you familiarize yourself with the setup, make the necessary adjustments the first time, and experiment a bit, later on you will be able to configure each new project more quickly and with ease. Most importantly, you'll be able to enjoy the performance boost without having to move your native apps to WSL.
This method isn't ideal; you might think it's too troublesome to sync the files from time to time manually, it might be an overkill for your particular use case, and that's perfectly fine. On the other hand, it might be just right for you and your projects. For now, I accepted the good with the bad, its shortcomings don't actually bother me that much anymore, and I really enjoy the better page load times and being able to use my tools the same as before, without any issues.
Bonus step
Now that your setup is up and running, you might want to check out how you can interact with Docker containers without ever having to leave PhpStorm and how we can configure a PHP CLI interpreter using the Docker compose file: Interact with Docker containers without leaving PhpStorm.
Enjoyed the article? Consider subscribing to my newsletter for future updates.
Originally published at geoligard.com.